Sunday, December 2, 2007

PimpMyDock and Screenshots

I knew it wouldn't be long before someone created a full-blown application, cocoa support and all, just to change the Dock. The program is called PimpMyDock and seems okay, although a little confusing at first. Plus, it is in need of several features to force it to replace my custom workflows. For one, it allows you to create a theme from a folder. This is nice because most of what you download at leopardocks is nothing more than a folder containing image files. But, where this becomes cumbersome is you have to individually import each folder which requires telling the program where to store the theme file each time. This could be improved. But another feature that my simple scripts will never have is the ability to view the image files before selecting the theme. Also, this program allows you to modify the theme by dragging new images into it and saving it as a new theme file. It really is the best option for those who don't want to deal with Applescript and Automator especially considering that Leopard has only been out a short time. I have no doubts that the program will improve a great deal over time and because of the extension the author applied, I feel it will actually become a standard in Leopard Dock themes.

Recently I installed Electric Sheep on my macbook. If you're not familiar with the program, it is a screensaver that is adaptive. It's designed to propagate only the best images. Random screen effects are displayed and you can vote by hitting the up or down arrows. This basically sends a screenshot to a server and based on popularity the computer decides whether to foster or kill the design. You can even design your own images to start with, upload them, and if they are popular you will see their resemblance in new offspring. Anyway, I also use a program called Backlight 2 that can take any screensaver and run it on my desktop as background. Sure, it can be kind of distracting, but it's really impressive looking, especially to Windows users. Backlight has a really cool preference, simple as it may be, you can set the opacity of the screensaver so that your desktop background can be partially seen. I have a large collection of Apple icon wallpapers and have Electric Sheep run at 50% over some of them is quite cool looking. I want to be able to save some of these images to use as wallpaper in the future, but how? Well, I have yet to figure out an easy way that doesn't involve downloading another app. I'm tired of downloading apps for what I think I could do in an applescript or built-in software, but alas there is nothing so far that can do exactly what I want. Let me explain...

Apple provides several screenshot options. The most obvious are the shift-command-3 and shift-command-4 which takes a full-screen screen shot and a selection respectively. But, did you know that you can shift-command-4 hover the mouse over a window, dock, menubar or desktop itself and hit the spacebar, it will highlight the entire item. This is really sweet and I wish I knew about it a few days ago when I was taking screenshots for this blog. However, the one and only disappointment is that it doesn't work with backlight. When I try to get the screen capture of the desktop while backlight is running, it is the correct image only it is washed out due to the opacity setting. Plus, when screensaver is active, any keystroke exits before you can take the screenshot. Not that it matters because I want the apple logo behind the sheep. I have figured out how to put Finder in Kiosk mode, (see the image) but I haven't figured out how to script it. It requires the modification of Finder.app->info.plist file and I can't seem to find a convenient way to script that change. It requires adding a key and deleting it, even though changing the value is supposed to work, it never did for me. But, if I can learn how to get Applescript to edit the info.plist file of the current application, I can turn Kiosk mode on and off at will. I really want something this simple because I feel that there are many apps which would be best served to run in Kiosk mode; The Gimp, Photoshop (although the builtin functions are quite adequate), iPhoto, X11. In fact, turning off the dock for most things might be good, after all, it isn't gone for good and I use command-tab plus quicksilver to do most of my work. So, finding an easy way to modify that key would be great.

After a few hours of work (yeah, I seem to have that kind of time right now), I've figured out a way to do this. It isn't pretty, but none of my scripts ever are. Plus, it does not work on Finder. I'm sure with a bit more research I can get it to either use a Finder alias or to authenticate to allow the change, but directly it does not yet work. However, this works perfectly for every other normal application. First, it asks you to search for a .app file. Then it does some testing to see if the key in the info.plist file is there. If the key is not, it puts one in at a default value of 0. Then it evaluates the value of the key, if it is 0 it will change to 4, and vice versa. Lastly, for any application that happens to be running when this occurs, it does a killall on it. That part doesn't always work so you're best to not have the application open when running this. But, for the most part it does what I wanted. Now I can turn the Kiosk mode on or off for any application. I would like to polish it eventually so that it could work on the current open application, but I doubt I'm going to go that far with it. Take note of one thing if you decide to do this, do not enter the name of the plist file as info.plist. Follow my script exactly and enter it as info only.

Apple Feedback

Saturday, December 1, 2007

Corrections to Automator Post

A week or two ago, I posted a suggestion on how to change the Dock background. I then commented on that blog about how it doesn't work right. Well, I have finally figured out a few things on how to make it work properly. First, the attached link takes you to a page with many new Dock designs to download for free. There is even an app to help change the Dock, but I had problems with it and so I still had to write my own. What I discovered is that even though you can use shell scripts, you can't use sudo. And if you don't have permission to make the change and are never prompted for a password, the shell script simply exits without making all the changes. So, I had to rethink my method of changing the dock. Plus, I didn't want to have to write a script for every single new Dock background I wanted. So, I developed a slightly longer version that asks you where the files are. This also allowed me to incorporate some other features such as changing just the separator or just the indicators. Thus, I now have 4 scripts to change the Dock as follows:

ModifyDockIndicators
ModifyDockSeparator

ModifyDockTheme
RestoreOriginalDock

I think these are all fairly self explanatory. The idea is that ModifyDockTheme will copy all .png files from a folder and replace them in Dock.app. So you could have a veritable theme with total customization of the Dock. I did not include a ModifyDockBackground script because I figure I'd use the theme more and if I wanted to I could simply use the other scripts to change the indicators or separator to what I want.

Here is a screenshot for Restoring the Dock. This is one is particularly important because I run it in all the other scripts so as to always start from the original.
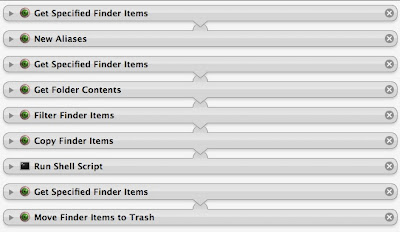
I minimized all the scripts because the titles are most important. The first step gets the resources folder in Dock.app. It creates an alias to it on the desktop. This is extremely important because for some reason the finder scripts in Automator don't allow access to protected folders. By doing this the alias doesn't seem to be protected. Also notice that some of these scripts don't have arrows connecting them. If you aren't familiar with Automator, you can right-click on the title and tell it to ignore input. This is also important and handy to keep Automator from getting confused. Next I tell it to get specified finder items, this is the folder that contains my backup of the original Dock. The next line gets the contents of that folder, then I filter it by .png, and finally copy them to the alias on the desktop. Be sure to tell the copy command to overwrite existing files. The shell script only does one thing, killall Dock. Lastly, I get the alias and move it to the trash to clean up my desktop.

Now, I'm not entirely sure why this works where the last one fails. It never asks me for a password to make the change. But it has been flawless ever since I wrote it. Now, save this script as an app. Keep it in a location where you keep all your apps and never move it or your other scripts will be broken.

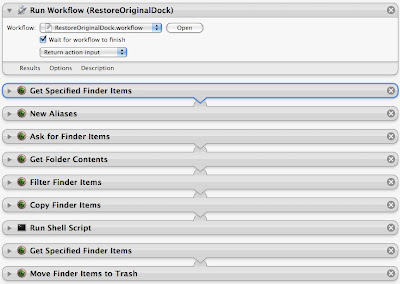
Next is a screenshot for modifying the Dock theme. You don't have to have a theme really, but this script filters all .png files in the folder of your choice, so if you only have the 4 scurve files, those will get copied. But if you have a full-blown them, all .png files will get copied. Here's how it goes.

The first step uses the restore script to bring the Dock back to factory specs. For the theme script, I chose to do this all the time so we don't get a mixture of themes. I follow all the same steps as before, only this time you'll notice that I ask for finder items. This will prompt you to pick a folder containing .png files for the Dock. It will filter all .png files, copy them into the alias, restart the Dock and delete the alias, just as before. Pretty simple huh.

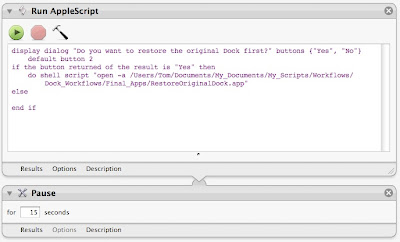
Lastly, you may want to change only the separator or only the indicators. It is the same script as above except I've included an applescript to prompt whether or not you want to restore the Dock first. The pause is important because sometimes it doesn't perform the operation fast enough and you end up with two aliases on the desktop, then it only deletes the one. So be sure to include the pause for proper cleanup. Also, there is one other key thing. When you filter you have to put in indicator for the indicator script, or separator for the separator script. Since the only files in a Dock theme that contain those names are .png, it is safe not to look specifically for an image file.

I've placed all of these in a folder where I keep all my custom designed workflows and apps. I created an alias to that folder and placed it in my scripts folder so it'll show up in my scripts menu. I did this because I was tired of trying to keep track of all the copies of scripts I have and where they are stored. So now I create aliases to the original location and place the aliases in scripts or finder plugins. This keeps all my scripts in my Documents folder under Scripts where I can keep a very organized hierarchy as well as keep them in a consistent place and never move them, ensuring that they always work.

As a last comment to all of this, you can see how running three scripts could create a custom them. You can run the ModifyDockTheme script to change the overall appearance, then run the Indicator and Separator scripts to alter those to your liking. And guess what, it doesn't take much effort to see that all you have to do to save your custom theme is write another automator script to filter the .png files from the resources folder and copy them to a new folder of your choice of name. You can have an endless supply of personal themes.

I hope you've enjoyed this Automator and Dock changing tutorial, and I apologize for the misinformation from before.

Apple Feedback

X11 was lost, but now is found

For my lab work I use X11 all the time. I have to connect to school via ssh and run a custom program designed by CERN to analyze data from proton-proton collisions. When I installed Leopard the first time I didn't do an upgrade, after having read some disturbing issues with that. So I opted to use the migration assistant and install all my data from a smart disc image created by SuperDuper! That did work, and most things seemed to work after that, including X11. There were some problems, however, including more space taken up than I thought should be. So I reinstalled Leopard and manually brought my files and some programs over. It was a smart move on the behalf of disc space, I saved over 20 GB by doing this. That's how much unused junk I had on my system. Anyway, this didn't come without its costs though. X11 was barely functioning. Part of the problem is I didn't know what I was doing. I configured X11 for Tiger once, at the beginning of Summer, so I didn't remember a thing about what I read or how to do it.

Apple made several changes to X, including changing from Xfree86 to X.org or something like that. It turns out that if you keep your old .xinitrc and .bash_profile you will experience problems. X launches in a whole new way now. There are also two physical instances of X11.app on the system. I'm still confused by that, but now I don't care. You also should NOT run X at startup. One of the key features is that unlike Tiger, you can now click an X application and X will launch on it's own without having to be previously opened. That was a huge improvement. But it just didn't seem to work right. My connections would work for a little bit, then suddenly I'd get errors and nothing would work. No windows from the remote machine, and therefore no work done. I was getting rather upset by this because I wanted Leopard so bad, but didn't count on it breaking my connection to work.

This is when I decided to remove all instances of X11. I figured that somehow, some Tiger configuration got mixed in with Leopard and the whole thing was broken. Here are some steps I took to remove it. Type these commands in Terminal.

sudo mv /usr/X11 /tmp/
sudo rm /System/Library/LaunchAgents/org.x.X11.plist
sudo rm /Library/Receipts/X11User.pkg
sudo pkgutil --forget com.apple.pkg.X11User

Above instructions obtained from: http://aaroniba.net/articles/x11-leopard.html

I also added a few steps of my own which included a manual search for X11.app to ensure all copies got removed, those that didn't I deleted manually. Plus, I removed all instances of X11 preferences. I wanted no trace. Lastly, I knew that .xinitrc was a problem, so I renamed it and commented out the line in .bash_profile as follows:

#export DISPLAY=:"0.0"

Then, I reinstalled X11 from the optional installs folder on my Leopard disc. But before running it I restarted just to make sure everything was sound. (I know, this is proof that I was once solely a Windows user.) And still, before running X, I found this awesome update utility that would fix many of the current bugs. For some reason, Apple isn't releasing updates for X in a timely manner. They probably figure that they'll get it right first, but in the meantime we have to suffer. Fortunately, there are some bright people out there and X11 is being updated with many beta packages. To finally fix X, run these two commands from Terminal.app.

curl -LO http://people.freedesktop.org/~jeremyhu/x11-apple/x11_update.sh
sudo sh x11_update.sh

This was obtained from: http://www.x.org/wiki/XDarwin

What this will do is search for packages that need to be updated, download and install the updates. Ever since doing this, X has worked perfectly, it even shows up on my second monitor which was broken originally. Granted, these are not necessarily stable packages, but I trust these guys to get it right. If something doesn't work, you can bet they'll have a fix for it within a day and that's a damn sight better than Apple right now. I plan to run this script frequently and get myself on a mailing list so I know when updates are available. Thank you Jeremy, this has enriched my life!

[EDIT]
The above steps have been discontinued due to, I guess, different support of the Xquartz project. This link, http://forums.macosxhints.com/showthread.php?t=80171, tells you a bit about it and has links to the new source for X11 updates. It works just as well, if not better than Jeremy's solution, but his no longer works. These updates have been quite regular and have allowed my system to become more and more stable. Now, GIMP rarely crashes X11, and I can only imagine it will get better.


Apple Feedback