Now, there are many reasons why GW2 would stutter; RAM, Swap Space, CPU cores, heat, poor GPU, etc. I can't possibly cover all scenarios. This little write-up is specific to heat issues.
My laptop is a fairly new Samsung Notebook 7 Spin. I got the lower spec'd model with only 12GB RAM and a 5400 RPM drive. I immediately swapped out the drive for an SSD, but I have never once used more than 12GB of RAM on my personal computer, so I left that as is. This laptop has an NVIDIA GeForce 940MX GPU in it, as well as an Intel I7-6600U. None of these are top of the line, but they aren't shabby either. I got this computer because my HP Spectre x360 mobo fried, it was a refurbished model and there was no warranty. That will teach me never to buy a refurbished computer or an HP ever again. I wanted something with a touch screen, which the Samsung has, and dedicated graphics which the HP did not have. My goal was to have a solid performing laptop that could handle Visual Studio, TFS, Office, and the majority of the games I play which aren't particularly high on the graphics scale. Well, that was what I thought.
When I started playing GW2, after only a few moments it would stutter when turning around. This got worse with more players in the map, more feature rich zones (like Verdant Brink), and anytime I upped the graphics settings in the game for a nicer appearance. I thought this PC should be able to handle it. My ASUS is 5 years old, a 4th gen I7 processor, and using the 560M graphics card, why does it render GW2 so much better and at higher settings?
Heat is the reason (well, that and the fact that my old ASUS was a quad core where the U processor in the Samsung is only a dual - the difference being 8 logical cores vs four, the four had to work much harder). However, I didn't know that right away. When I researched the problem, I found lots of possibilities, but the best website was the Guild Wars 2 Performance Guide. It basically led me to using hardware monitoring tools to observe what my CPU and GPU were doing.
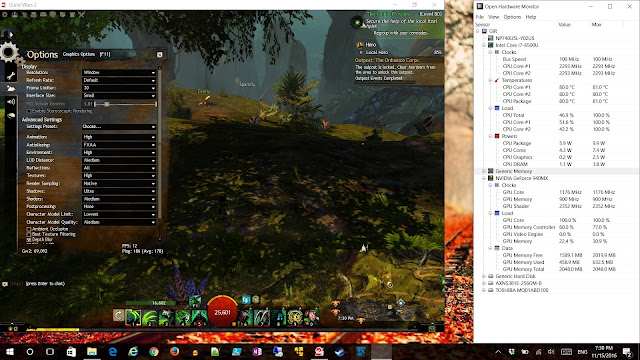
Note that only the OpenHardwareMonitor showed the NVIDIA GPU, the standard Hardware Monitor only showed the Intel GPU which was useless to me.Anyway, as I played the game, I noticed that the stutter occurred when the CPU core temps approached the mid 80s and on up to over 90°C. Using some of the information in the guide, I tried to tweak my settings to maximize GPU usage while minimizing CPU usage.
Another note from the guide is that GW2 is designed to use CPU by far more than the GPU.The guide only gave me an idea of what to do, but didn't answer the question of what the best settings were.
There were two crucial things I did to remove the stutter almost completely. The first was to change my power settings. The second was to use the frame limiter. Both of these would reduce core temps.
Normally, you would think that when the laptop is plugged in you can simply use 100% of your CPU. However, with a CPU intensive game like GW2, extended use at 100% will overheat the cores, as I had witnessed. The first thing I did to try to reduce this was to change my power options (Power Options > Change Plan Settings > Change Advanced Power Settings > Processor power management; change the minimum state to 5% and the maximum to 90%) so that I only used 90%. It seems, at least with this particular laptop, that Windows is more gentle about controlling the CPU usage when you set a value like that rather than letting the CPU itself reduce the frequency when it detects an overheat condition, which it apparently does rather aggressively resulting in the stutter. While the frame rate (frames per second or FPS) does decrease with a lower CPU usage value, the overall effect is that the CPU does not heat up as much. Naturally, you could just have extra fans or some sort of cooling pad under the laptop. I don't want to carry more stuff with me just to play GW2 on the road, so setting this value down seemed the most efficient way to handle this. I decided to create a GW2-only Power Profile so that these settings would only be in use when I play the game.
The power setting wasn't quite enough though. I also used the setting within GW2 that limits the framerate to 30 FPS max (Options > Graphics Options > Frame Limitation). Why did I do this? Well, if you hover over the option, it indicates that it will reduce power consumption and heat. Oh really?!? It was effective, provided that the settings are such that the FPS would have been increased otherwise. I was able to maximize the graphics settings in GW2 to give me a nice balance of features that used GPU more than CPU and even those that use CPU would not overheat the CPU cores.
Now, one thing to note is that different zones (maps) use different features, so these settings may not be optimal for all zones. That is why I picked 3 zones to play around with, Lion's Arch (generally the most populated zone), Gendarran Fields (a fairly simply PvE zone), and Verdant Brink (a graphically dense PvE zone requiring a lot more CPU and GPU cycles). In the end, I optimized for Gendarran Fields and LA first, then went to Verdant Brink to lower the specs just enough to make it function smoothly there.
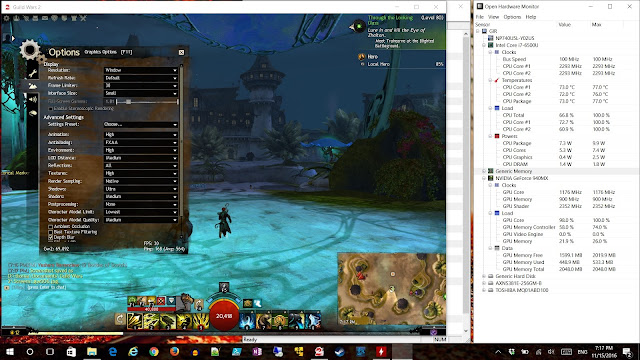 |
| Settings in Lion's Arch, FPS sits nicely at 30, GPU usage is high while CPU cores are below 75 degrees. |
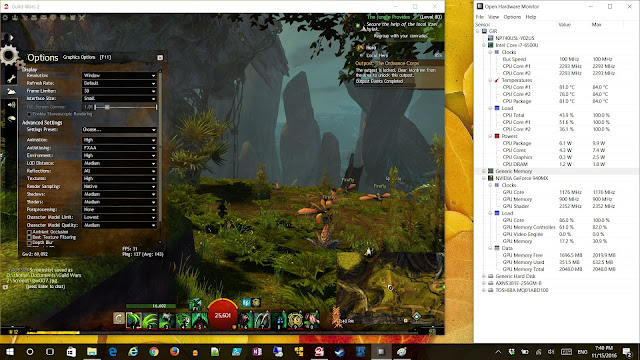 |
| The biggest change here was to reduce Shadows from Ultra to simply Medium. I also got rid of Depth Blur, it didn't offer much. |
You can opt to change whatever settings suit you and experiment with how your system will handle them. I liked using the Windowed mode to observe in real time how changes I made affected both CPU and GPU. However, I would not use Postprocessing as that is done entirely by the CPU. Every time I set that to Low or High, the stutter would come back. As a last ditch effort, you can change the full screen resolution. I know the other guide said it would look terrible, but I found you could still get a decent looking screen by upping the graphics settings and adjusting things like the camera zoom levels, the interface size to small and so on so that it looks closer to native resolution. Hey, what more can you ask of a mid-level laptop?
